Scheduled Job Action - Send Expiry Notifier
Overview
The Send Expiry Notifier Action is used to send a message to Members to notify them that an asset (such as an Offer or Reward) is due to expire shortly. You can define the date calculation as "x number of days before expiration." You can also optionally define additional criteria to exclude Members from receiving this notification.
Typically, a Send Expiry Notifier Scheduled Job should be scheduled to run once daily.
This Scheduled Job Action type can be used in conjunction with one or more Segments. When you add a Segment to the Scheduled Job, only Members in that Segment are eligible to be part of the Scheduled Job's audience. See Define Scheduled Job Eligibility for more information on adding Segments to the Scheduled Job.
Parameters
This Action has the following parameters:
-
Content Type: Select the type of asset: Campaign, Gift Card, Punch Card, Offer, or Reward.
-
Content: Select the asset of the type you selected above.
-
Depending on the asset type selected above, configure the following additional options:
-
Campaign: From the Campaign Offers Status drop-down menu, select an Offer status: Pending, Clipped, or Pending and Clipped. The platform will evaluate the expiration dates of Offers in Campaigns that have the selected status value(s).
-
Gift Card: From the Clipped Only drop-down menu, select True if you want the platform to evaluate only Gift Cards with a status of Clipped.
-
Offer: From the Status drop-down menu, select an Offer status: Pending, Clipped, or Pending and Clipped. The platform will evaluate the expiration dates of Offers that have the selected status value(s).
-
Punch Cards: In the Remaining Punches field, optionally enter a threshold of punches remaining on an active Punch Card. A Member must have less than this many punches left to be part of the Scheduled Job's audience.
-
-
Notify: Enter the number of days before expiration when you want to send the message.
Member Exclusion
Optionally, you can define selection conditions for this Action type. Members that match these conditions will be excluded from receiving the expiry notification.
To define Member exclusion conditions:
-
Click the Add icon, then select Add Rule. The platform adds a new blank row.
-
The first drop-down menu is populated with all of the different object types in Loyalty that are available for use. From this drop-down menu, select one of the following object types to expand it and see the available options:
This option allows you to define a logical statement based on a value in a Member Attribute.
-
From the menu, select the desired Member Attribute.
-
Select a mathematical operator; the available operators will vary based on the Data Type of the item you selected above.
-
Enter or select a value.
This option allows you to define a logical statement based on a value in a Member Preference.
-
From the menu, select the desired Member Preference.
-
Select a mathematical operator.
-
Enter or select a value.
This option allows you to define a logical statement based on a Member's inclusion in a Segment (or exclusion from a Segment).
-
From the menu, select Member.
-
Select a mathematical operator - either In (inclusion) or Not In (exclusion).
-
Search for and select a published Segment.
This option allows you to define a logical statement based on a value in a Function.
-
From the menu, select the desired Function.
-
Enter or select a value (the operator is always "equal").
-
Repeat the above steps as needed to define more Rules. Optionally, to delete a Rule, click the Delete icon next to it.
-
Once you define more than one Rule, select the logical operator from the Include customers that meet drop-down menu:
-
All of the following: Use an 'AND' operator such that all Rules must be true for a record to be selected.
-
Some of the following: Use an 'OR' operator such that at least one of the Rules must be true for a record to be selected.
-
-
Optionally, you can also organize Rules into Rule Groups. A Rule Group allows you to build more complex selection criteria. To create a Rule Group, click the Add icon, then select Add Rule Group. The platform creates a Group, which is represented visually as a nested box with its own operator and Add icon. Within this Group box, click the Add icon to define the Rule (or Rules) using the same process as described above. Use the toggle within the Group box to define the logical operator for the Rules within the Group. To delete an entire Rule Group, click the Delete icon just above the nested box representing the Group.
Note: By clicking the Group button inside the Group box, you can create "nested" groups.
Email Platform
The Loyalty platform integrates with several Zeta products for email sending, as well as with external platforms.
-
Send Messages Via: Select the deployment platform. The configuration options for the different platforms are described below.
Loyalty Message
Note: This feature is intended only for clients using Loyalty's legacy email platform.
If sending a message via Loyalty, this Action has the following parameters:
-
Messages: Select one or more Messages.
Cheetah Digital
If sending a message via Cheetah Digital, this Action has the following parameters:
-
Connection Profile: Select a Cheetah Digital Connection Profile.
-
Target Table: Enter the name of the Campaign source table within Cheetah Digital.
-
Campaign ID: Enter the "Running Campaign ID" of the launched Cheetah Digital Campaign.
-
Content Sources: Optionally, select one or more Content Sources.
Note: Content Sources are an optional feature designed to accommodate more advanced use cases, such as sending a list of multiple Offers to Cheetah Digital for use in a Looping Block.
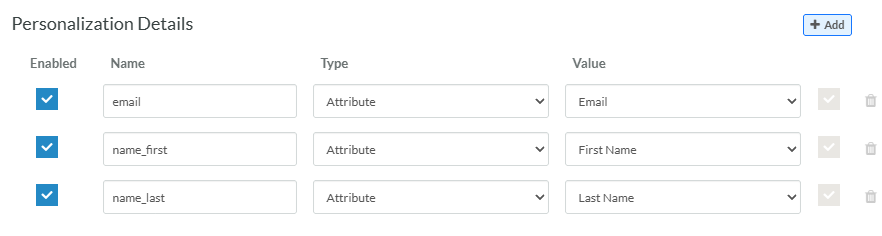
Personalization Details
You may need to add custom parameters within the Personalization Details section if, for example, you're using values from Loyalty to populate Personalization Fields within the email message content. To use personalization, you must know the name of the desired field as it appears in the Merge Symbol in the Cheetah Digital content. You must use the internal name of the field, and not its display name. For example, let's say you have a message that uses first name and last name values to personalize the message. You would need to add those Merge Symbols to the email content in Cheetah Digital, like this:
-
Hello, {(name_first)} {(name_last)}
The values in these Merge Symbols must reference existing fields in the Campaign's source table in Cheetah Digital. Otherwise, the Cheetah Digital application will display an error message when you try to save or launch the Campaign.
To define a personalization field, click Add within the Personalization Details section, then enter the following information.
-
Check Enabled.
-
Within the Name field, enter the value as used in the Merge Symbols (without the brackets).
-
From the Type drop-down menu, select one of the following:
-
Attribute: Use a Loyalty Member Attribute. From the Value drop-down menu, select the desired Member Attribute. The value of the selected Member Attribute will be passed in the API call to Cheetah Digital.
-
Metric: Use a Loyalty Member Metric. From the Value drop-down menu, select the desired Member Metric. The current balance of the selected Member Metric will be passed in the API call to Cheetah Digital.
-
Content Token: Use a Loyalty Content Token. From the Value drop-down menu, select the desired Content Token. The value of the selected Content Token will be passed in the API call to Cheetah Digital.
-
Advanced: Enter an expression in the Value field to derive a value.
-
Repeat the above steps as needed to define additional personalization fields.
External Message
If sending a message via some other Email Sending Platform, this Action has the following parameters:
-
HTTP Operation: Select an HTTP API Template.
Custom Parameters
This Action supports the use of custom parameters. To define a custom parameter, click Add within the Custom Parameters section, then enter the following information.
-
Check Enabled.
-
Within the Name , enter the name of the parameter.
-
In the Value field, enter the parameter value.
Repeat this step as needed to define additional custom parameters.
Salesforce
If sending a message via Salesforce, this Action has the following parameters:
-
Connection Profile: Select a Salesforce Marketing Cloud Connection Profile.
-
Method: Select an HTTP method: GET, PUT, POST, or DELETE.
-
URL: Enter the webhook endpoint.
Additional Parameters
The URL Parameters section is used to define the URL parameters in the Salesforce API call.
To define a URL parameter, click Add within the URL Parameters section, then enter the following information. Repeat this step as needed to define additional URL parameters.
-
Check Enabled.
-
Within the Name field, enter the name of the parameter.
-
Value: Enter either:
-
A static value to assign to every Member.
-
A Content Token or a Groovy expression to populate this parameter.
-
-
If you entered a static Value, check Static. Otherwise, uncheck Static.
The Query Parameter, Request Header, and Form-Data / Request Body sections are used to define additional parameters for the API call. Repeat the above steps as needed to define these different types of parameters.
Selligent
If sending a message via Selligent, this Action has the following parameters:
-
Connection Profile: Select a Selligent Connection Profile.
-
Journey: Select the applicable Selligent Transactional Journey (Journey API name) to trigger. This selection represents the Journey sending out the transactional messages, such as welcome, reward, or birthday messages, for example.
-
Language: Select the language that Selligent should use when sending the message. Note that only one language can be selected. If you need to send transactional messages for multiple languages, you must create separate Scheduled Jobs for each language.
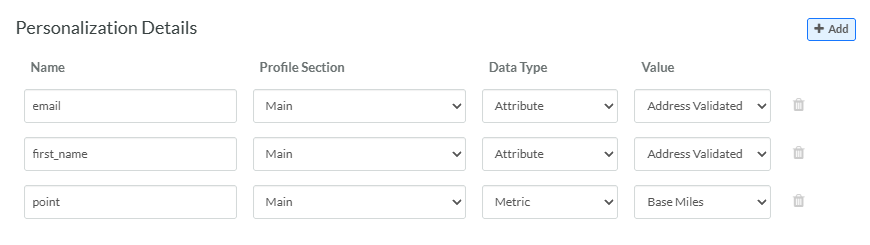
Personalization Details
You may need to add custom parameters within the Personalization Details section if, for example, you're using values from Loyalty to populate Personalization Fields within the Selligent email message content.
To define a personalization field, click Add within the Personalization Details section, then enter the following information.
-
Within the Name , enter a field name from the Selligent main audience or extended Loyalty profile.
-
From the Profile Section drop-down menu, select either the Selligent Main audience (scope MASTER) or the Extended Loyalty profile( scope ENGAGE_LOYALTY).
Note: The Selligent main audience is determined by the message used in the Transactional Journey.
-
From the Data Type drop-down menu, select one of the following:
-
Attribute: Use a Loyalty Member Attribute. From the Value drop-down menu, select the desired Member Attribute. The value of the selected Member Attribute will be passed in the API call to Selligent.
-
Metric: Use a Loyalty Member Metric. From the Value drop-down menu, select the desired Member Metric. The current balance of the selected Member Metric will be passed in the API call to Selligent.
-
Content Token: Use a Loyalty Content Token. From the Value drop-down menu, select the desired Content Token. The value of the selected Content Token will be passed in the API call to Selligent
-
Repeat the above steps as needed to define additional personalization fields.